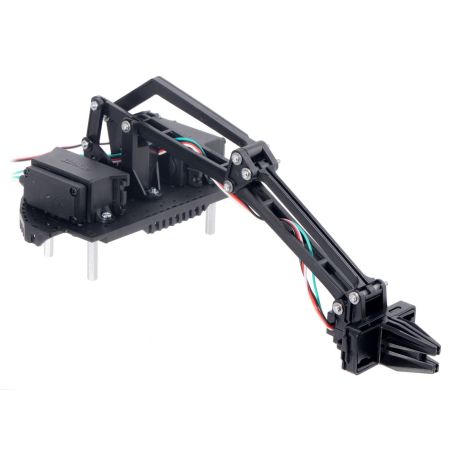


Robot Arm Kit for Romi - Black
Robotic Arm kit for Romi
- 2 servos to control the arm.
- 1 gripper (with additionnal micro servo).
- Gripper can be mounted vertically or horizontaly
- BLACK

Payments are secured by LyraCollect, a French payment collection company.

It is possible to delivered to your home, to a pick-up point or picked up by appointment at MCHobby

We prepare, pack and ship your orders with great respect and care.
Add a Robotic ARM to your robot or Romi plateform
This accessory kit will empower the Romi robot with a robotic arm to manipulate the surroundings objects!
The kit contains everything to build the arm: it has a micro gripper and 3 servos (controlling the arm's height, controlling the gripper's tilt and gripper paddles actuator). The 3 servos have been modified to provide an extra feedback signal, this signal access the servo's feedback potentiometers. With this signal, you can design advanced project with closed-loop control of all three joints. You can also ignore that signal and use the servo's as usual.
This Robot Arm is an accessory for the Romi Chassis and allow it to manipulate small objects around it. The kit also includes a micro gripper with paddles, paddles are like 4 fingers that can slide up to 32 mm to apart to uphold items. Finally the kit also contains the arm linkages for supporting the gripper and the platform to mount everything to. The assembly is actuated by servos that are specially modified to provide access to their feedback potentiometers (through a fourth green wire). This additional wire lets you detect if something is interfering when moving to the commanded position. This feedback also enables more complex closed-loop control of the arm from your microcontroller.
.jpg)
The Romi arm mounts on the rear half of the Romi chassis with aluminum standoffs (ideally just above the motors). Two standard-size servos are sitting on the base and control the height and tilt angle of the micro gripper. The micro-servo is placed inside the gripper to move the gripper's paddles.
Please note that larger servos (lift and tilt) can draw up to around 1.8 A each (when commanded to move abruptly), their typical current draw should be under 1A each. The stall current of the micro gripper servo is approximately 0.8 A at 6 V. All three servos can be powered from 4.8 V to 6 V (nominal). The servo have approximately 1:1 correspondence between their position in pulse's milliseconds and the feedback voltage (in millivolts). EG: the feedback voltage will be ~1.5 V at the angle position corresponding to 1.5 ms servo pulses.
.png)
The gripper can be mounted at the end of the ARM in 2 ways: a horizontal (scoop) orientation or a vertical (crane) orientation (see picture here under). The gripper uses a rack and pinion gear design so the servo uses spline and opposing racks to keep the gripper paddles synchronized and parallel to each other throughout the range of motion.
.png)
The maximum payload of the arm is 100 gr. The gripper can open to a maximum width of 32 mm. The full range of motion of the gripper's servo requires the microcontroler to generate the pulses beween 0.5 ms (fully open) to 2.4 ms (fully closed). This is beyond the standard hobby servo that range from 1 ms to 2 ms, so check that your control electronics is capable to generates such signals (if you need the full 32mm range for the gripper paddle).
The robotic arm have been designed such a way that most of the arm’s weight is positioned at the back of the chassis. Lifting objects will generally cause the Romi to tilt forward, so we recommend adding a second ball caster to the front of the Romi. You can use a rubber band to stiffen the suspension of this ball caster if desired (see the user’s guide for more information). The assembly instructions and details to use the Robot Arm for the Romi are available in the Robot Arm for Romi User’s Guide (Pololu, English)
Kit content
- One Micro Gripper with Position Feedback Servo
- One Romi expansion platform
- One main arm
- One rear tilt arm
- One front tilt arm
- One pivot stand
- Two servo mounting brackets
- One short linkage
- Two pivot transfer linkages
- One tilt servo horn
- One lift servo horn
- One alternate tilt servo horn attachment
- One alternate life servo horn attachment
- Two standard-sized servos with position feedback
- Six 20 mm nylon spacers, 4 mm OD, 2.7 mm ID
- Three 6 mm nylon spacers, 4 mm OD, 2.7 mm ID
- Two 1.5″ aluminum standoffs, #2-56 thread, M-F
- Two 1″ aluminum standoffs, #2-56 thread, M-F
- Six 1″ #2-56 Machine screws
- Three 3/8″ #2-56 machine screws
- Four 1/4″ #2-56 machine screws
- Thirteen #2-56 hex nuts
- Nine #2 washers
- Six 8 mm M3 machine screws
- Six M3 hex nuts
Tutorial
- Robot Arm for Romi User’s Guide (Pololu, English)
