


PYBStick to HAT (Raspberry-Pi) for Interface
Plug one or two Raspberry-Pi HATs on your PYBStick
- 1x PYBStick interface
- 1x Raspberry-Pi HAT interface
- 1x optional second Pi-Hat interface

Payments are secured by LyraCollect, a French payment collection company.

It is possible to delivered to your home, to a pick-up point or picked up by appointment at MCHobby

We prepare, pack and ship your orders with great respect and care.
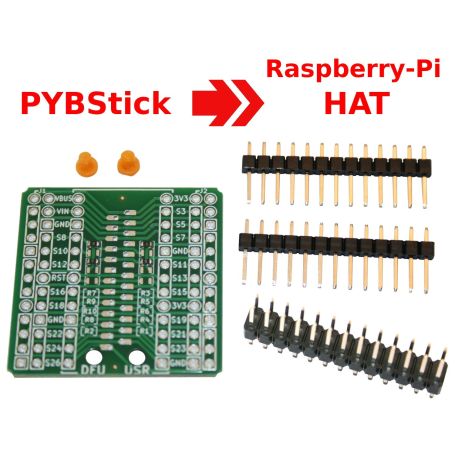
Interfacing the PYBStick with Raspberry-Pi Hats (pHat) made easy
The HAT-FACE is the very first product of the PYBStick eco-systeme. It allows you to plug the PYBStick on a Raspberry-Pi HAT (so a "Hat interFace") and to drive the HAT from MicroPython/Arduino code running on the PYBStick.
All the basic function of the Raspberry-Pi's GPIO is mapped down to the PYBStick. So the I2C, SPI, UART buses are mapped and will help to control the HAT plugged onto the interface board.
The PinOut and schematic of the HAT-FACE will greatly helps to write your own code against the HAT you want to control.
This interface board controls the 26 first pins of the Rapsberry-Pi GPIOs (the most common) as few of the HATs does care about the extra pins (from 26 to 40). Want's to control a LCD display (SPI bus) or sensor board (I2C Bus), maybe an Adafruit Motor Shield (I2C bus)... no problem... this board is made for you.
Some MicroPython drivers for HATs are also available on the pyboard-driver github under the PYBStick section.
Content
For each order you will receive:
- 1x Adapter board for PYBStick
- 2x section of 13 male pin header (for PYBStick)
- 1x section of 2x13 male pin header (for HAT)
PYBStick and Raspberry-Pi's HAT not included.
Assembling this interface board is quite easy. Just follow the instructions in the tutorial mentionned below.
Tutorials
- Assembling the Hat-Face (MCHobby, Wiki)
- HAT-FACE pinout and examples (MCHobby, Github)
Schematic and pinout - pyboard-driver github for the PYBStick (Pyboard-Driver, GitHub)
- MicroPython drivers for HAT interface (esp8266-upy, GitHub)