


[T] - HUZZAH! ESP8266 WiFi breakout
A WiFI board based on ESP8266, LUA script, ready to use

Payments are secured by LyraCollect, a French payment collection company.

It is possible to delivered to your home, to a pick-up point or picked up by appointment at MCHobby

We prepare, pack and ship your orders with great respect and care.
11/20/2016: It is now possible to reflash the board to support MicroPython. 20/11/2016:
See these tutorials, you will need to reflash your ESP8266 module to support MicroPython.
Description
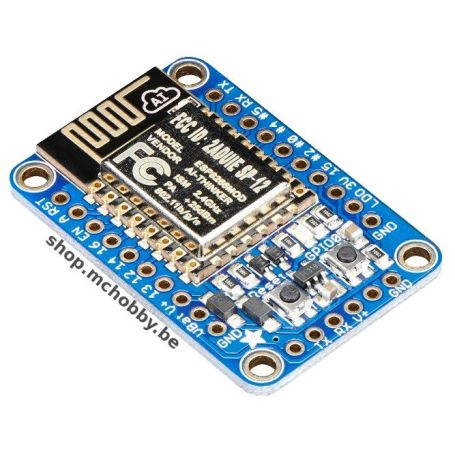
Connect your next project to the Internet with this adorable, affordable and mini WiFi microcontroller! The ESP8266 processor from the Espressif company is an 80 MHz microcontroller incorporating full WiFi support (as well both in client mode and access point mode) and a TCP / IP stack with DNS support. Although the ESP8266 is really popular, this component is very difficult to use. Most inexpensive modules are not compatible with breadboards, don't have a voltage regulator (3.3V at 500mA), nor a logic level converter and are not CE certified or FCC transmitter. UNTIL NOW!
The HUZZAH ESP8266 Adafruit is a breakout designed to be super easy to use and with which you will have a lot of fun. Adafruit has selected the ESP8266 module certified and already equipped with an antenna. This version of the module has many pins, all available on the Huzza board.
This board includes:
- A Reset button.
- A user button also used to place the module in "Bootloading" mode,
- A red LED that you can flash,
- Logical level conversion (Level shifting) on the UART (serial port) and the Reset pin,
- A 3.3V regulator capable of delivering 500mA.
You should know that the ESP8266 consume up to 250mA (so you only have 250mA available for your project) - Two protective diodes for power sources (one diode for the USB cable and the other diode for the battery input)
Two series of parallel connectors (breakouts) with an impaction compatible with breadboards. These connectors will give you access to:
- 1 x analog input (1.8V max)
- 9 x GPIOs (3.3V logic), which can also be used for I2C or SPI
- 2 x UART pins (serial port)
- 2 x power inputs (3 to 12V),
- Reinitialization (reset), enable, LDO-disable,
- 3.3V output
At one end of the board, there is a pinout "FTDI" allowing to connect a FTDI converter or a console cable so that you can upload / download your software on the HUZZAH. This FTDI connection also makes it possible to read / write debugging information via the serial port (UART). When you have finished programming the module, simply remove the cable (FTDI converter) and enclose your HUZZAH in a case.
Each module is preloaded with the Lua NodeMCU interpreter (NodeMCU 0.9.5 build 20150318 / Lua 5.1.4 to be more precise), Lua is incredibly powerful. Using the USB-Serial converter, you can execute commands and "save" your Lua script directly in the Flash memory of the module. But if you want, you can bypass Lua and use Arduino IDE directly. Once you have uploaded the Arduino support to your HUZZAH ESP8266, you can use it as a microcontroller + WiFi board, no need for an external processor!
Content
For each order, you receive a HUZZAH ESP8266 board assembled and tested, as well as a row of connectors that you can weld on your board (to insert it on a breadboard). You will need a welding iron and a little weld to do this operation.
The breadboard, console cable, FTDI converter are not included with the Huzzah board.
You'll need a USB-serial cable like the console cable (good for Windows, not recommended for MacOSX users) or a USB-Serial converter USB-Serial converter (FTDI Friend, suitable for all OS), OR an FTDI cable (suitable for all the OS) in order to download your software to the HUZZAH ESP8266! See the tutorial section for more information!
Technical data
- Dimensions: 25mm x 38mm x 5mm
- Weight: 5g
- Pre-programmed with NodeMCU 0.9.5 build 20150318 (Lua 5.1.4)
- ESP8266 data sheet
- FCC test report for the module used on this breakout (contains FCC ID: 2ADUIESP-12)
- FCC ID: 2ADUIESP-12-F (fccid.io)
- CE test report of the module used in this breakout
- You'll find a large amount of information on http://www.esp8266.com/ (Community Forum)!
- The NodeMCU web page (Lua for ESP8266) with examples and documentation on the Lua framework
- Arduino IDE support for ESP8266 (GitHub, Anglais)
- Don't forget to visit esp8266.com to stay up to date with the latest news on ESP8266, software and the latest gossip!
Tutorial
- Adafruit HUZZAH ESP8266 tutorial (Adafruit, English)
- Using Arduino IDE with the HUZZAH ESP8266 (Adafruit, English)
Other Adafruit tutorials
- Adafruit IO basics: digital input (Adafruit, English)
Contact and understand Adafruit IO - The basics of Adafruit Adafruit IO: digital output (Adafruit, English)
Turn on a lamp from anywhere! - Adafruit HUZZAH ESP8266 Breakout (Adafruit, English)
The affordable small WiFi microcontroller! - ESP8266 WebServer for temperature / humidity reading (Adafruit, English)
Use an ESP8266 as a microcontroller in the form of a low cost WiFi server. - Add a third party board on Arduino IDE v1.6.4 + (Adafruit, English)
Easily add support for the Adafruit board in Arduino IDE v1.6.4! - Compile and use MicroPython on an ESP8266 (Adafruit, English)
How to compile and install MicroPython on an ESP8266 WiFi breakout! - Huzzah Weather Display (Adafruit, English)
An OLED display weather station - Home Automation in the cloud with ESP8266 and Adafruit IO (Adafruit, English)
Build a home automation system and control it from anywhere! - Use IFTTT with Adafruit IO to create an IoT door opening detector (Adafruit, English)
Who enters or leaves the house - Control the door opening using a digital fingerprint sensor and Adafruit IO (Adafruit, English)
Open a door cover from anywhere with your fingerprint! - Remote control using Huzzah + Adafruit.io (Adafruit, English)
Configure a Huzzah to control another one somewhere on the planet!
 - FTDI Friend")
")
