


USB Barcode Scanner
Barcode scanner, USB, CCD Camera

Payments are secured by LyraCollect, a French payment collection company.

It is possible to delivered to your home, to a pick-up point or picked up by appointment at MCHobby

We prepare, pack and ship your orders with great respect and care.
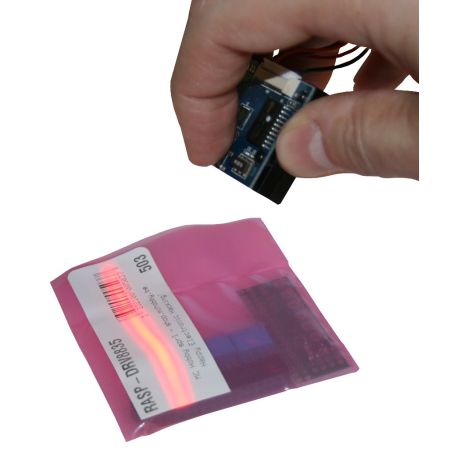
Add an ultra fast barcode scanner to your applications
Decode almost any 1D barcode (striped barcode) in your projects. Here is a compact, lightweight, low-power barcode scanner that can be easily integrated into a project. This OEM scanner module incorporates a small camera that captures 100 frames per second. By using a CCD sensor, this scanner do without the famous rotating mirrors (which can be seen on the crates of many stores). Less mechanical element also means fewer problems (risks of damage or misalignment).
Note that a scanner is based on a "photographic" sensor and IS NOT a scanner using a laser - So you will need to keep the scanner farther than you would with a laser-mirror scanner! Try a distance of 10cm.
The scanner is the simplest all-in-one module you could find. It ends with a USB connector, plug it into a computer (or nano computer like the Raspberry-Pi or BeagleBone, etc) and the scanner is identified as a simple keyboard (called "HID keyboard").
When a barcode is scanned, the data is decoded, the parity checked and the barcode broken down into characters sent on the keyboard interface (as if someone were entering the numbers of the barcode on the keyboard).
As with all barcode readers , this module is delivered with a basic configuration available as soon as you turn it on. You can change this configuration by scanning special barcodes available in the manual. This will allow you to change the time between keystrokes (when the barcode is sent to the computer), or change the end-of-sequence character, and so on. See the download section where you will find the different manuals available. If you want to change the default setting, print the manual on white paper and scan each of the 'setup codes'. The configuration will be saved in a non-volatile memory... so you will need to do it once.
This reader will read a wide variety of standardized barcodes. the most common ones like CODE39, CODE128, EAN-13, ISBN-13, EAN-8, Interleaved 2 of 5, Codabar/NW7 and UPC-A and E are supported as soon as power is applied.
At MC Hobby, we often use the CODE39, CODE128, EAN13 barcodes... perfect with these readers.
Consult the manual to activate rarer standards, you will probably need to go through a configuration step to activate them.
What are these characters &é"'(§è!çà !!!
In its default configuration, your scanner is configured to pretend to be a qwerty keyboard. The most popular keyboards in the world. On a qwerty keyboard, the first row of keys is 1234567890 while on our azerty keyboards, these same keys produce &é"'(§è!çà .
The wrong option is to use the SHIFT LOCK key (block the keyboard in uppercase) and hoping to get the numbers. This is because, on very recent OS, you will get accented upper case with the SHIFT LOCK key.
On Linux Mint, you will get &É"'(§È!ÇÀ but if you hold down the SHIFT key, you will get the long-awaited 123456789 sequence. In short, you will need to avoid approaches unless you are a fan of a puzzle.
The solution is to ask your scanner to speak AZERTY!
In the manuals of the download section, you will find the "Configuration Flow Chart" which allows you to reconfigure the properties of the scanner using special barcodes. Here are the different entries to make:
- Enter the barcode "Start Configuration"
- Enter the barcode "Belgium" or "French" which can be found in chapter "ch 6 Miscellaneous Parameters" under chapter "6.1 Language Selection" (selection of the language... and therefore of the associated keyboard format)
- Enter the barcode "End Configuration"
The settings will be active until the next power up... unless you execute point 4 below. Execute point 4 only if you are certain that the configuration is correct and functional. - Enter barcode "Save Parameter"
Your configuration will be saved in the EEPROM of the scanner. These settings will be automatically reloaded the next time you turn on the power.
Technical details
- Light source: Red visible 632nm, LED
- Depth of fields: 230mm @ 0.5mm, PCS90%
- Resolution: 0.127mm, PCS90%
- Ambient light: 5000 Lux Max
- Voltage: +5V ±5% continuous
- Consumption: 80mA
- Reading indicator: Beeper
- Scan speed: 100 scans/sec ±10%
- Operating temperature: 0°C to 50°C
- Storage temperature: -20°C to 70°C
- Relative humidity: 20% to 95% (without condensation)
- Mechanical shock: 2000G, 0.7ms, 3 axes
- Interface: HID keyboard (via USB)
- Cable: +/- 1.5m.
- Connection: MOLEX 11 pin Pitch 1.25
- Weight: Approx. 17 g (without cable)
- Dimension: 44 mm Width x 30 mm Depth x 19.2 mm Height
- Mounting hole distance: 34mm