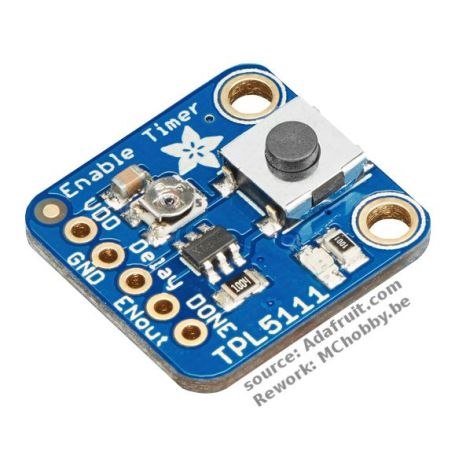


TPL5111 - Timer Low Power
- Configurable Timer (with Potentiometer)
- Actived once every 100ms a 2 hour
- Reset Enabled (to restart the timer after job done).

Payments are secured by LyraCollect, a French payment collection company.

It is possible to delivered to your home, to a pick-up point or picked up by appointment at MCHobby

We prepare, pack and ship your orders with great respect and care.
Configurable low power timer to activate project
It is sometime quite hard to use the deepsleep functionnality of some boards is sometime quite difficults (even almost not possible). Other board does not have low-power/sleep/deep-sleep mode.
So what could we do when it's time to spare the battery or running from solar power with such plateform? To run for long time on battery needs some energy sparing technics.
You could remove the regulator (dissipating power with heat), extract a relay (wasting power). Or, use a timer like 555 to regulate power-on/power-off cycles. However, all thoses approach are not really great!
The Adafruit TPL5111 is a Reset Enable Timer, a stand-alone breakout that will easily turn any electronics project into low-power electronics! It will take care of enabling et disabling (switch on/switch off) the project by using its built in timer. The timer can vary from once-every 100ms to once every 2 hours.
The TPL5111 use a current draw of 20µA while running (but the project not powered/enabled). Current measured by Adafruit.
You can also activate manually the project (turn it on) by pressing the button available on the TPL board. The tactile switch is wired to the Delay pin, so you can also wire your own button to the Delay pin to activate the TPL!
TPL5111 vs TPL5110
Notice that the TPL5111 also exist as TPL5110 flavor used to drive a power pin (instead of a enable pin). The TPL5111 breakout is best when you have an enable pin that you can control.
The TPL5110 would be best when you are able to 'break' the power input line of the project. TPL5110 must be placed between the power supply and the project's Vin.
How to use
The usage is easy.
- First, set your desired delay but adjusting the on-board trim pot: to the left is once-per-100ms and to the right is once-every-2-hours.
- Then, connect VDD up to your 3-5V project power supply,
- Then, connect the project's enable pin to the TLP5111 Enable pin.
- Finally, select a signal pin from your project and wire it the the TLP5111 Done pin.
In your project's code: make sure that the TPL5111 Done pin is set high once the microcontroler did finished its job.
That's it, the TPL5111 with start a new timer round!
Content
Comes as a fully assembled breakout board with a TPL5111 chip, all components on-board, and some header. A little light soldering is required to put it together for breadboard use.
Technical details
- Dimension: 19.5mm x 17.8mm x 5.0mm
- Weight: 1.4gr
- TPL5111 datasheet
Tutorial
- TPL5111 Reset Enable Timer Breakout (Adafruit, English)
Enable and disable your projects on a timer like a boss