


RGB Matrix HAT + RTC for Raspberry-Pi
HAT controller Matrix RGB - RTC - for Raspberry-Pi

Payments are secured by LyraCollect, a French payment collection company.

It is possible to delivered to your home, to a pick-up point or picked up by appointment at MCHobby

We prepare, pack and ship your orders with great respect and care.
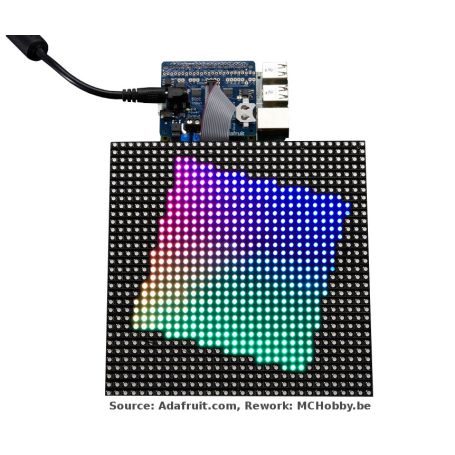
Drive a RGB LEDs matrix from the Raspberry-Pi
Now, you can create amazing displays with your Raspberry-Pi using this HAT Matrix RGB. This HAT plugs into your Raspberry-Pi and it becomes super easy to control RGB Matrix such as those you find on our WebShop. You can easily make a scrolling display or a small "bright wall".
This HAT is certainly one of the most beautiful achievements of Adafruit so far, a great tool filled with interesting circuits. Let's see what it's all about:
- KISS design - to be easy to use... plug in the power supply, plug in the IDC cable, run the Adafruit Python code!
- Power protection circuitry - You can connect a 5V 4A power supply to your HAT and the HAT will automatically be protected against negative bias, over-voltage and under-voltage! The best protection against accidental destruction during setting up.
- Logic voltage converter - this card incorporates level shifters to convert the 3.3V voltage levels of the Pi to 5V in order to drive the LED matrix without any display problem/incident.
- A DS1307 real-time clock - So your Pi stays on time even when it is rebooted and turned off. Having the time on your Pi is handy for displaying the time on a giant display.
Works with any LED RGB 16x32, 32x32 or 32x64 RGB LED Matrix equipped with HUB75 connection. You can even chain multiple matrices together to get an even bigger display. Just remember that the bigger the display, the more complicated it will be for your Pi! We recommend not to exceed the size of 32x128 pixels.
Warning: This HAT can only be used with HUB75 type RGB matrices. This HAT can not be used with NeoPixel, DotStar or other addressable LEDs.
Content
Each order contains the HAT (with assembled SMD components) and tested + a 2x20 female connector + a 2-pin terminal block and a 2x8 IDC connector. The CR1220 coin cell is not included but you can easily get one from any store (this battery is needed if you want to use the real-time clock).
The RGB matrix is not included but we have a selection of slab HUB75 in our LED category!
The Raspberry Raspberry-Pi is not included (but we have 'em in the shop so pick one up, model A+, B+, or Pi 2 only!)
You will also need a 5V power supply (not included) to power the matrix itself. The Pi can not power the matrix, the current needed is too important. To evaluate the maximum current required, multiply the width of all matrices chained by 0.12. For a matrix of 32 pixels wide, we have 32*0.12=3.85A (you will need a power supply of 5V 4A).
Some welding operations will be necessary to attach the 2x20 connector to the card. A welding iron and a little weld will be needed and this task is not difficult and should not take more than 15 minutes for a beginner.
See the tutorial section of the product sheet to find schematics, wiring diagram, instructions and Python library!
Technical details
- Dimensions: 65mm x 56mm x 13mm
Tutorial
- Use the RGB Matrix HAT with your Pi (MCHobby, French)
- Use the RGB Matrix HAT with your Pi (Adafruit, English)
- NextBus transit clock (Adafruit, English)
Create a scrolling LED display