


HDMI Monitor for Raspberry-PI - 1280x800 - 7"
7" TFT moniteur with High resolution display for embeded project
- 7" Diagonal
- 1280x800 (720p) IPS
- HDMI/VGA/PAL/NTSC
- 9V power supply

Payments are secured by LyraCollect, a French payment collection company.

It is possible to delivered to your home, to a pick-up point or picked up by appointment at MCHobby

We prepare, pack and ship your orders with great respect and care.
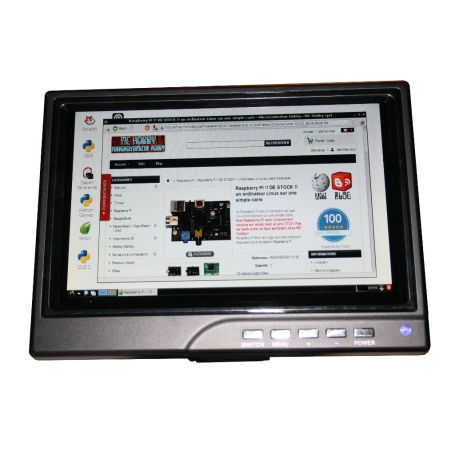
A high resolution HDMI monitor for embeded project
Here is finally a 7 inch TFT HDMI screen (17.8cm diagonal) to the height of performance of the Raspberry-Pi. Need a space-saving solution, transportable... This TFT is compact and has a breathtaking resolution! Ideal for a project with strong integration. We found the HDMI/GVA display as small as possible with both high resolution and a high contrast. This screen has HDMI, VGA and video-composite inputs. The screen is very simple to use - simply connect the included continuous power supply to the jack (2.1mm, positive center), then connect a digital video source to one of the inputs, press the "power" button to turn on the screen... and here we go!
If you are using it with your Pi B or B-PLUS, connect the HDMI cable, turn on the monitor.. then only you can boot your Pi.
The front face is equipped with a few buttons to activate the menu system to adjust the brightness, colors and contrast. It automatically detects the input used and activates it. You can also select the input from the menu.
Contain
The TFT screen comes with a foot (see photo product) and has 4 mounting holes at the back (spreading 75mmx75mm and M4 screws) what to tie the TFT in a case or place a Vesa Mount Raspberry (use short M4 screws!). The bottom of the screen also has an M4 hole, the latter can be used for fixing on a camera support.
Comes with a 9V power supply compatible with 100-240VAC networks (European plug, see picture). The power supply may vary depending on our supply. We tested it in 12 Volts and it should also work in 5V.
This screen doesn't include a speakers.
Use with a Raspberry-Pi, BeagleBone and other devices
- As you can see from the product pictures, we have tested this screen with our Raspberry-Pi. You will need to edit the contif.txt file to optimize the display (see support section).
- You can also connect it to any device with HDMI, VGA or NTSC/PAL output.
- According to our supplier, this screen works perfectly with BeagleBone Black (no need for configuration). However, you will need to use a keyboard/mouse to prevent the screen to switch off.
Use with Raspberry-Pi
To optimize the display on a Pi, we recommend that you modify your conifg.txt file.
We were pleasantly surprised to see that the following settings offered a frankly grandiose result:
#hdmi_safe=1
#disable_overscan=1
# uncomment the following to adjust overscan.
overscan_left=-25
overscan_right=-25
overscan_top=-205
overscan_bottom=-25
Our supplier offers this configuration instead.
Technical details
- 5-24V Continuous power supply (positive center)
- Consumption of 700mA under 12V
- Ratio 16:10
- Resolution: 1200 x 800
- Visible surface: 150mm x 95mm 16:10
- Brightness: 400cd/m2
- Contrast: 800:1
- When we opened one of these screens, we found an HSD070PWW1 (we assume that all televisions have such hardware or similar)
- Auto-detection between VGA, HDMI and Composite
- Case dimensions: 180mm x 130 x 30
- Weight (off power): 290g
- NON COMPATIBLE HDCP - it can't be used with 'secure' HDMI sources
The IPS of the product denomination corresponds to "In-Plane Switching", this technology allows a greater viewing angle of 170°. The blacks are deep and the perfect rendering (source: over-blog.com)
- Raspberry Compatibility
- Zero / Zero W, Pi 3A, Pi 3B+, Pi 4, Pi 400/500, Pi 5, Zero 2 W
- Interface : Connector
- Video : HDMI, Video : RF, Video : VGA


