


[RETIRE] Pi Box Plus a crystal case for Raspberry Pi
[RETIRE] Transparent "crystal" case of Adafruit for Pi 3, Pi 2 and Pi B PLUS

Payments are secured by LyraCollect, a French payment collection company.

It is possible to delivered to your home, to a pick-up point or picked up by appointment at MCHobby

We prepare, pack and ship your orders with great respect and care.
This product is no more available at MCHobby
A beautiful crystal case to admire your Pi
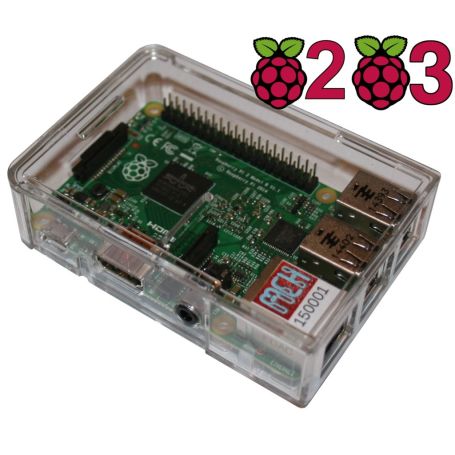
The crystal case of Adafruit, until now realized with the laser cutter is now available in its molded version. Result, a case just as "crystal" but more affordable and ready to use. This case is perfect for Raspberry-Pi 3, Raspberry Pi 2 and Raspberry Pi Model B+.
Put your Raspberry Pi® safe while being able to admire it through beautiful transparent case made of acrylic (plexiglass). Adafruit made this case to be beautiful, easy to use (a base and a cover that is placed and removed easily... handy for those wishing to tinker).
Made using transparent acrylic/plexiglass crystal. This case makes it possible to secure your Pi and has a cover providing access to the connectors. The Raspberry Pi comes to fit inside and held in place with a system of clips. You can use all connectors on the periphery of the Pi: HDMI, Audio/Video, Micro SD connector & micro USB power, Ethernet and the 4 USB ports. There is also a cutout to let the 40-wire IDC cable to connect your devices to the GPIO.
For advanced hacking: it is possible to remove the cover (which is clipped). This will allow you to connect any kind of cable at will on your Pi. If you plan to use your Pi at full power, it is possible to improve the ventilation by removing the cover (or by drilling small holes in the case).
Place and clip your Pi
Engage your Raspberry-Pi so that the HDMI and micro USB plugs are engaged in the corresponding holes.
The two fixing holes of the Pi (HDMI side) must engage the fixing studs provided for this purpose.
Then, push on the USB connector on the other side of the card to present the other side of the card facing the other two fixing studs.
Finally, you clip the card in place by pressing the Raspberry-Pi logo (visible on the card) and always on the USB connector.
See this operation realized LadyAda (animated gif, AdaFruit Industries)
Raspberry-Pi not included.